Tuesday, October 30, 2007

Window swap

Our attention was split roughly in half Monday evening. There was the kitchen window to install, and there was the afternoon discovery that our radiant system was reading zero psi. After getting the furnace lit (it burned out over night) and shepherding it on to a brisk flame, we got down to the kitchen window replacement. Throughout the evening, we checked on the radiant to see if we were getting any flow. We weren't, as it turned out. They say that trapped air is usually the cause of problems in these systems and we'd have to repeat the isolate/purge sequence of flushing the system, but what worries me is this zero pressure thing.

Back upstairs to the window project. With some prying and some sawzall work on the nails and caulk, we removed the window, frame and all. It was already in the 40s and with this huge hole in the side of our house where once there was a window, things were cooling off rapidly in there. Erika stapled up some plastic to keep the wind out.

The replacement window is a good deal smaller than the original window, so we knew that we would need to frame in the rough opening a bit. We measured up the replacement window and rough opening and split the work: Erika took to assembling the vertical framing members and I took to the horizontal.

It felt good to be doing something that we know how to do (and, we couldn't have said that 6 or 7 months ago). No instructions, and barely any pausing. One two three, we were nailing in our frame and trying to fit the window in place. We did have to trim about 5/16 of an inch off the bottom spacers but after that, the window went in, we leveled and plumbed it, and nailed it in place. Done. Well, for the night. We need to caulk it up and trim it out, but that's nothin'.


Erika also stapled some plastic to the outside of the house, over the (basically non-existent) bathroom window that we're about to replace, and also hung a wool blanket over the inside of it. At least now the bathroom isn't 20 degrees colder than the rest of the house!

Before calling it a night, we went outside to check on the furnace, which we planned to just let burn out since we couldn't circulate that heat through the house. Since we had the circulating pump for the furnace turned off, the furnace had reached a very high temp and shut itself down. It brought to light something I hadn't noticed in the manual, and that's that the high/low setting is controlled by one box with two dials, and what I thought was the high temperature aquastat is actually a high temperature safety cutoff aquastat. Good to know. We turned its pump back on and cooled the water a bit. It returned to a normal temp and restored power to itself and we let it burn out.

Now, to figure out what's going on with the rest of the system...

- John

Monday, October 29, 2007

Snoopy takes a ride


It was another epic weekend at our house. John's post recounts the fact that our heat system is now up and running, which is a milestone as big as when we finished the bathroom and moved into the house. It's huge and wonderful. As if that weren't enough, this weekend my dad came to help and we moved our shed!

A little background: One of the many items on our work writeup, which is the to-do list we agreed to so the bank would finance our renovation, is to tear down this shed that sat several feet behind the back corner of the house. We're not sure how old it is, but it's a nice little frame structure with a high metal roof, wooden siding, and a picture of Snoopy gone fishin' painted on one side. Its rock foundation that had gotten very wobbly, and all the wood around the bottom (floor and the lower parts of the walls) was in very bad shape. Because of that and its proximity to the house, the bank required for safety reasons that we tear it down.


Well, we didn't want to. We know we're going to need a shed, so if we tore this one down we'd just be building or buying another one within a year. Other than the floor and foundation, it's in good shape. We decided to build new foundation posts for it in a different spot, up the hill at the edge of our yard, and move it.

And so we did.

Friday

It was raining, raining, raining. We could hardly complain, since this rain ended a 6- or 8-week drought and got our creek flowing again, but it did make it interesting to dig the holes at the four corners of the new shed location. I was home from work that day and procrastinated most of the morning in the dry house, but eventually had to put on the rain gear and get out there with the shovel and do it.

I'd found out that the frostline locally is 16 inches, so I was aiming to dig 20-inch holes so that our foundation posts won't move around when the ground freezes and thaws. It felt really good to dig into our soil--made the idea of gardening on this property much less abstract. We do have many rocks, but the soil is nice. I used the fork to loosen and the shovel, until it wouldn't fit down in the holes anymore, then got on my knees and scooped dirt out with plastic containers. Pretty messy.


After a couple of hours I had three nice holes. In the fourth spot, there is a giant rock that I couldn't move, or even find the edges of. Probably fine just to leave it and let the shed sit right on it.

Saturday and Sunday

Saturday started out grey, but soon became a warm, sunny day with rain glistening on the trees. What a gift for this outdoor project. Dad and I got to work on what would be a long couple of days' worth of shed wrangling.

I won't recount this whole project step-by-step, which I can't reconstruct in my memory anyway. How do you move a shed? The basic idea was to first reinforce the structure with some nice big planks nailed like a band around the bottom of the building, plus some diagonals for stiffness. We dragged out all the old boards and other stuff that was in there, including big rocks that may have been part of the foundation at some point, but were now totally loose. Then Dad used a couple of floor jacks and the yellow hydraulic jack (familiar from our beam weekends) to levitate the shed all the way off its bumpy foundation. Then we inserted skids (2x4s and other random pieces of lumber) under the two side walls, then rollers (lengths of iron pipe) under those, then more skids under those. Now the shed was, literally, ready to roll.


Of course, it had to roll uphill, so we ran chains between a couple of the wall studs and up to a point on the middle of the uphill wall, then hooked two big come-alongs between the chain and Dad's truck, which he parked up at the edge of the yard. This would be the mechanism for dragging the shed up to its new spot.

Sounds fairly simple, but we fought for every inch of ground we gained. The shed is funky and the ground slopes diagonally across our intended path. So nothing happened in straight lines. Many, many times the shed fell off its rollers. Continually, as it moved uphill, it turned toward the downhill side. It also tended to drag its back end on the ground, making the pulling harder and causing more turning. So the pattern was basically this: get the rollers and skids all set up--hoping nothing crashes down on you while your hands are under the jacked-up walls--then let the jacks down and winch the shed uphill 8 or 12 inches until it falls off the rollers again. Then start over. Dad's considerable experience with engineering this kind of ridiculous project was much in evidence--I did a lot of just watching and handing tools while he buzzed around at light speed, digging and winching and jacking and putting in rollers and skids.


Long story short, we got about halfway up to the new site on Saturday. That put us off the old foundation and onto the grass, which was an improvement. Sunday, we moved the truck and hooked the come-alongs to a couple of trees instead, and got the shed to the point where one back corner is right over its final resting point. The other three corners will have to pivot into their correct positions, though, and we left that for another time. It was 3pm and Dad had to start driving home, plus we were exhausted. So it was best to just stabilize the shed where it was and call it a weekend.


The journey of Snoopy left a wake behind it: small pieces of wood used as shims, divets in the lawn where we dug out to fit the floor jacks under the structure, a trellis that used to lean against the shed, and a pile of rocks and dirt where the shed used to be. Our yard has opened up nicely and, minus a few odd angles, we can sort of see what it'll be like when the shed is squared up and in place. Snoopy stares into the woods now. If he could talk, he'd say, "Thanks, Dad." Well, maybe not, but I'll say it.

- Erika


Go Heatmor Go!

The following is a recounting of the final three days of heat system installation. Yes. On the eve of the first frost, our home was warm.

Thursday

Thursday night, a bit rainy and all that, we installed the domestic coil in the back of the furnace. I had been apprehensive about this job since it entailed cutting into a gasket at the back of the heat jacket and I figured this would be precision work that would need to be done right the first time. It wasn't so bad, as it turned out. With a bit of prying, the rear cover came off and a solid rubber gasket was revealed. I scratched the date into it then cut away the center.


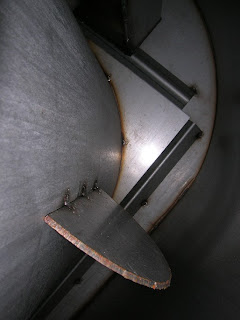
I looked into the furnace and understood it much more. There's the fire box, which is what you build the fire in, and then the rest of the furnace will be filled with water. A big box of water with a big fire box in the middle of it all. Neat. We put a bead of silicone around the gasket and inserted the copper coil. Then we tightened the brass fittings on and connected the water lines to it.


Friday

Friday night, Erika's dad arrived and we made an awesome dhal and I tried out a tandoori chicken recipe that killed and we ate and drank until late, when we decided to take a hike up the trail to the back corner of the property in the pouring rain. We stayed up there for a while, it was like being in another place entirely. It was great, and we were soaked.

Saturday

I started off helping Erika and Marty with the shed a bit, but eventually realized that if we wanted to get the heating fired up this weekend, I'd have to get to work on finishing the installation.

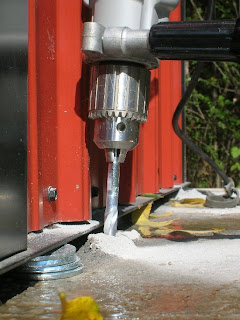
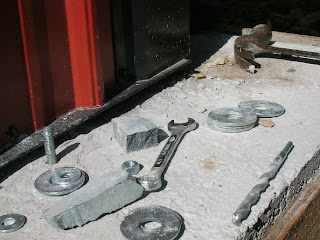
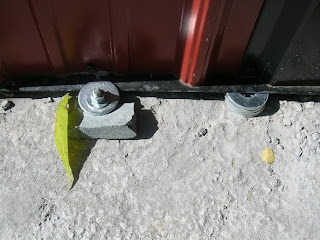
First, I had to secure the furnace to the concrete pad. I drilled four holes into the concrete just beside the base of the furnace and pounded some concrete anchoring bolts into the holes. I used a couple of large washers to sandwich the base of the furnace to the pad, and ended up using small chunks of soapstone as a fulcrum for the other side of the washer. The anchors took some adjusting, but in the end the furnace was shimmed and clamped tightly to the pad.


Second, I had to caulk the based of the furnace, inside and out. This is pretty self-explanatory. Done.


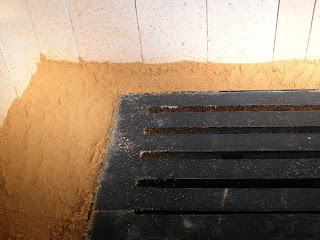
Third, I had to pack masonry (brick) sand all inside the fire box until it was level with the grates. We had some brick sand left over from when we made the grout for the bathroom floor but that didn't get me too far. I found a couple of cardboard boxes and drove down to the hardware store and parked the car around back by the sand pile, shoveled all I could fit into the boxes: 34 shovel fulls. This ended up being about half as much as I would need, so I ran back for another 34 shovels. On the way down the road, the car stopped running and wouldn't start. I was able to diagnose it pretty quickly - blew the fuel pump fuse somehow. I swapped the heater fuse for it (irony) and was on my way. That was the last run for sand. I packed it in and we were now sanded and ready for filling the furnace with water.


Fourth, I filled in the rest of the trench by the house.


I pitched in with the shed project for the last hour or two of the afternoon. We quit shortly before dark.
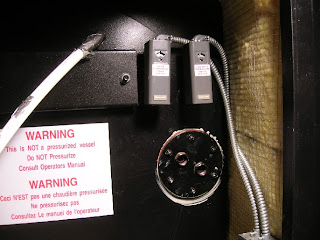
Sunday

We were up and outside at dawn. After a cup of coffee, I got ready to fill the Heatmor (furnace). Opened and shut the appropriate valves, read, read, and re-read the instructions, then turned on the water. I was surprised by how much water this thing takes. It filled for at least ten minutes before finally coming out the top from the pressure release vent. I cut the water source and opened up another valve in the furnace and the water rushed through the underground pipes to and from the house, filling them and pushing the remaining air out of the system. I filled the expansion bladder and topped it off through the relief vent on the roof of the furnace.

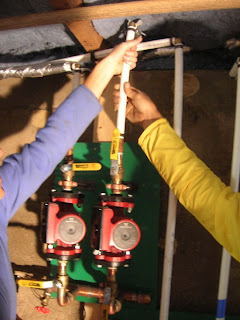
There were a couple of little seeping leaks - one at the back of the furnace, and one at the pump in the basement, but I tightened 'em up and they looked good.

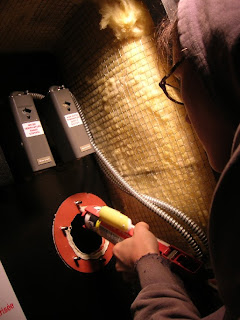
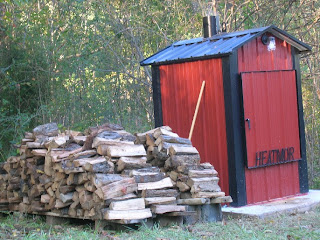
I built a little structure of newspaper, twigs, and small logs inside the furnace. When the shed crew got to a good stopping point, we gathered around the furnace and I lit it up. Hooray! Smoke started coming out the chimney. After the little fire got going, I shut the door and turned on the fan. Ten minutes later, I loaded it up with wood and we were good. The water temperature began to rise.


It was around 11AM when we lit it. It took a couple of hours for the water temperature in the furnace to reach 180 degrees. Once it did, the shed crew took another break and we all went down to the basement to click on the rest of the system. We turned on the circulator pump for the furnace and hot water began flowing from the furnace and through the heat exchanger, which heated up at an fascinating rate. Erika then set the floor temperature and the radiant pump clicked on and began circulating through the house. Again, hooray!


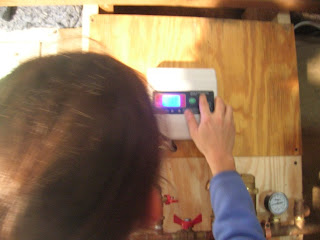
Then it was pretty much all shed for the rest of the day. Of course, I was constantly taking system and temp readings at the furnace, at the supply manifold, the return manifold, the mixing valve, the pressure, the floor temp, and the ambient temps. Everything was functioning perfectly.

It was clear by five or six o'clock that our house was definitely warm. This was amazing to me, since there are still a few joist bays in the basement that need to be insulated, and the kitchen roof/ceiling is totally uninsulated and our bathroom doesn't have a real window.

We stacked our first load of wood by the warm smell of the wood stove. I loved every minute of it and have been looking forward to doing this for years. This first load is mostly small pieces of wood. We've got a load coming right behind it with bigger logs. Once we get ahead of ourselves, we can get out into the woods and start bringing home the big downed trees out there. This fire can handle large, unsplit logs, as big as you can fit into its mouth. It just dissolves these little guys.


All night long, the temperature outside was dropping. Before we went to bed, it was 42 degrees outside. It was cozy in our home. I couldn't stop talking about it. Couldn't stop looking at the temp outside. We have a wicked system. And just in time for the first frost, which came several hours later.

- John

Wednesday, October 24, 2007

Brass, rubber, and foam

Got a few things done Tuesday night.

We managed to find an old double hung window, suitable size, framed and all at the Habitat Store for cheap. This window will replace the perfectly good one in the kitchen by the back door. The kitchen window will be moved to the bathroom, where one of the windows is nothing more than a couple of old storms with no frame, held in by a few small nails. It's drafty in there! The kitchen window is an exact match for the other bathroom window, so it will look good in there. The replacement window that we'll put in the kitchen will give way in a year or so to the rear double French doors project. Timeline is pending on that one.

Then we started attaching all the brass hookups to the furnace. We were stumped the night before because there was no way to screw the pieces on without being stopped by the body of the furnace - the valves protruded too far. We were told to disassemble those ball valves. They came right apart in the vice with a wrench. Fine. A warm windy night, dark, drop lit by the woods' edge, thread tape, pipe wrench. Worked on this until we ran out of thread tape. Just about done with that.

Final project of the evening: sealing up the conduit in which the water pipes run under ground. The last five feet of the trench is still open, where the conduit enters the basement. Since we ran the pipes in two separate 6" drain tiles and it reduces down to one as it enters the house, we had to come up with a way to make this transition from two to one waterproof. Ground water coming in contact with the pipes will quickly whisk heat away. Yes, we insulated the pipes, but we're taking no chances.


Following an idea that Erika's dad had, we procured an old truck tire inner tube and some large hose clamps. We sliced the tube open and set it under the transition point. Some weeks ago, Erika had cut the two drain tiles that we're using as conduits on angles so that they would come together without too much of a gap, so now we wrapped a couple of narrow strips of duct tape around it all to hold them together tightly, temporarily. We used some of the foamin' goo to caulk up the gaps, then we wrapped the inner tube around the single drain tile and tightened up the hose clamp. Our clamps weren't big enough to wrap around both drain tiles, so for the part where there is two, Erika cut another strip of rubber and I tied it on tightly around the inner tube and two drain tiles. I caulked the seams with some sealant, and foamed between the drain tiles and wherever else I could get to. Then we caulked up the hole in the foundation, where the drain tile enters the basement. Super. Now were finally ready to finish filling in the trench!

Next up: finish the furnace hook ups, shim and bolt down the furnace, fill firebox with sand. The excitement must be killing you by now.

- John


Tuesday, October 23, 2007

Final proof the house is eating us alive

Let's just check in for a sec. Here we are, nearly 8 months into the house project. We've already missed our first deadline, gotten an extension and had enough delays after that to be pretty sure we'll need another extension around New Year's. That means we're looking at close to a full year of this work, by the time things wrap up, which we agreed the other night we probably never would have signed up for, had we known what we were getting into. At the moment, we're fighting to finish the heat system. We've been working on that project since July. (Remind us to tell you sometime about how long that was supposed to take, according to the company that sold us the system. It's an absurdity worthy of its very own post.) Once the heat project is behind us, we have about four big projects left before the bank signs off on our renovation. It now gets dark immediately after we get home from work.

So what did we do yesterday?

We decided to take one of those four projects and make it way more complicated than it was supposed to be.

Our kitchen and bathroom, as you may know, are at the back of our house, the one-story part. The roof there has a pretty shallow slope; it meets the top of the rear kitchen/bathroom wall and rises about 3-4 feet by the time it meets the front kitchen/bathroom wall. The other night, when we were putting insulation over the bathroom, I was looking at the wedge-shaped space between the bathroom ceiling and the roof, thinking about how that can never be used for storage (too shallow) and is essentially dead space.

Then, at work yesterday, I randomly thought, "I wish we'd made our bathroom ceiling follow the slope of the roof, instead of making it flat."

Then I thought, "We could still do that in the kitchen."

I emailed John right away and we went back and forth about a few particulars—Can we take out the existing kitchen ceiling joists? How will this come together with our beam?—but somehow it was clear that this idea, once voiced, could not be ignored. As soon as we got home we went into the kitchen and sized up the possibilities. If we do this, we will have an angled ceiling and a very tall (13 feet or so) front kitchen wall, above our cabinets and stove. There's no doubt it would do glorious things for the feel of the kitchen and the drama of arriving in the back of the house after walking through the smallish, cosy front rooms. With some other changes we envision down the road for that room, this will make that whole end of our house really, really excellent and at minimal extra cost.

Of course, it'll mean more work and a whole series of those small problems that you have to solve as you're working though any project. (The rafters suddenly level off 4 inches from the back wall! We'll have to make a flat ceiling for a few feet outside our bathroom because of nailers we already put in for the bathroom wall! We'll have to get different light fixtures! But what about the rear dormer!) That means in turn "a couple more weeks" [insert more realistic and impossible-to-predict time estimate here] of pushing against our deadline and all the wrangling with the bank that entails—not to mention the other parts of our lives that we dearly miss and have been on hold for too long already. But honestly, unless we find out this is structurally impossible, we can't see not doing it. It would be too awesome.

There you have it: proof the house is eating us alive.

- Erika

Monday, October 22, 2007

Circuit Circus


We headed down to the hardware store to grab yet another stick o' pex tubing, some additional crimp rings, and to rent the crimping tool for what I declared to be "the last time, finally," barring any future repairs of course.

Way back when, about 1 or 2 days before we moved in, we plumbed the hot and cold water lines to the water heater in the basement. We had added a spur to the hot water line because we assumed we'd be needing that option for when we would splice in the furnace as a domestic hot water source. As it turned out, the furnace should splice into the cold lines. So, we had some plumbin' to do.

It was pretty exciting, cutting into live pipe. Cold water sprayed us down more than once, even though we had shut the valves. You see, we're pretty good with this simple material now. It didn't take long and there weren't any significant missteps. We connected the two remaining 3/4" pipes coming into the house from the furnace - ran them along the wall underneath the electric panel, up the wall, and over to the cold water line at the water heater. Each new pipe passed through a ball valve before T-ing into the vertical pipe and into the heater.


The idea is that in the winter time, when the fire's heating our house it will also be heating our domestic water. So when we turn that shower to hot, the water we're using will have run through a copper coil in the furnace before making its way to the bathroom. Efficient!

I rushed the crimping tool back down the road to the hardware store and declared "done!" Hoorah!

Next: the floor probe.

Given the thickness of our floors and the uninsulated state of our walls, we will be using a temperature probe under the floor rather than a thermostat to set our temperature. This is because with radiant heating, you're not really heating the air as much as you are the objects in the room and the house itself. Without boring you with the details (email me if you need the details), using a floor probe will result in less temperature swings and a more even and efficient performance.

To install the probe, I cut a small square of rigid insulation, dug a little notch out of it to stick the bullet-like sensor into, then screwed it up underneath the floor, using wooden shims as washers. Simply connected the two leads to some 18 gauge wire and ran the wires to the set point controller and voila.

Next: fill the radiant system!

That's right. Time to put some water in these tubes. First, we had to remove the Schrader valve and replace it with the expansion tank. This should have been smooth, but wasn't. It was the wrong size. But, we happened to have the right brass adapters to make it work. Second, you hook a garden hose up to the drain valve and another hose up to the fill valve and to a water source. We tied the hose from the drain valve off to one of the piers under the deck outside so that we could observe the water flow (looking for air pockets) and direct the water away from the house as it purged the system of debris and air. We made one more run down the checklist for the operation and then turned on the water. Erika opened the first circuit and I opened the valve to allow the water into the return manifold and out the drain valve.


With a woosh and a bang! Water was flowing through circuit one. There'd be a few sputters when an air pocket was pushed out and then the stream of water would be fairly consistent. The pressure would build to around 30psi until the air was pushed out, then it would drop back to around 17. Then we'd open up a second circuit and the water pounded through - pressure would drop, pressure would build, you'd hear the gurgling coming through, the hose would sputter, the pressure would drop, and then we'd open the next circuit.

Speaking of circus, Erika had her hands full outside trying to save all the water that we were using to flush the system. We're in a drought. To let 50 gallons or so of water go to waste is not something to be taken lightly. So, she was constantly getting buckets under the hose and scrambling around to find more containers...coolers, pots, big tupperware vats that we stored wedding food in... Meanwhile, the leaky garden hose in the basement was making a mess, but I was ignoring it. No other choice, really.


After we were pretty certain that the air had been purged from the system, I closed the drain valve and brought the pressure up to where we needed it (only about 14psi) and cut the fill. And there you have it.

I powered up the setpoint controller and pump. The probe was reading a floor temp of 68 degrees and the controller was set for 75 and click, on came the pump and circulated the water through the system. Awesome. But, it's cold water right now.

We've only got a night or two of work to finish the furnace hook ups. We plan to actually build a fire in that thing on Friday. We ate dinner Sunday night thinking, "by this time next week, we'll have a finished heat system and a warm house."

Awesome.

- John