Friday, December 21, 2007

Thursday night

We got two more pieces of ceiling up! This is a neat project in a lot of ways, one of which being that we accept the slow and deliberate pace at which each piece needs to happen. It's calming and gratifying. Erika measures and I write it down. Then I measure and she checks it against hers. If it's different, even by a 16th or 32nd of an inch, we each measure again. It's like this when we mark up the board for cutting as well.


Measuring up and clamping down a 2x4 guide for the circular saw:


Tape along the edge of the neighboring panel so that we can mark the locations of the screws and transpose them to the new board:


Two more pieces in place, aligned, and installed:


- John

Wednesday, December 19, 2007

Another one up

And the ceiling expands...

A sheet, cut to size:


The mighty forstner:


Press play!


And then we put it up...

Another reason we can't wait to get these ceilings finished is because the attic is pretty cold. Cold air just blows down from under the roof and right into the dining room. The house is fairly cozy now, but once we're closed up, the coze will be intensified.

- John

Tuesday, December 18, 2007

plywood goodwood

this is the "plan." dining room is on the right. the little square between the dining and living rooms is the chimney.


got two more pieces up on the ceiling last night. it is taking a while. everyone has heard measure twice but we've been measure fifteen times. we're keeping an eighth inch gap along all edges and we use a couple pieces of wooden paint mixing sticks, which happen to be the right width, as spacers.

and there's lining up the holes that we're boring for the screws with the holes on the neighboring panel. sometimes, you don't want the hole to line up, instead you want it to be exactly midway between two. after trying a couple of times to transpose this stuff from a panel that is already on the ceiling to one that is laying on the floor, Erika had a pretty brilliant idea: run a length of masking tape along the installed panel and make our marks on the tape. then we just removed the tape and lined it up on the new panel on the floor and transposed our marks. using a drywall square, we lined up with each mark so that we could mark the corresponding points in the center and on the other end of the panel. about thirty marks, total.

next, boring the half-inch holes with the forstner bit. very carefully stick the point of the bit onto a tiny mark, plumb the drill, a bit of pressure to cut through the top ply without splintering, then steady, easy, boring to a quarter-inch depth. some sections of the board are harder than others. sometimes the bit just bores through quickly. really need to remain focused for the entirety of each hole.

position the ladders and lift it up over our heads, line it up, put the spacers in. start predrilling for the screws with one hand while holding it perfectly steady with the other. start screws by hand, carefully drive them in while watching the height of the board's edge, repeat thirty times, and a panel is up.

at the moment, we like the look of the bored holes with the dark screw head centered and recessed inside them. time will tell whether we decide to cut plugs for them or not. everything changes with each panel that goes up. I was saying that it's hard to imagine what this is actually going to look like when it's all up. for each panel in our pattern, we've got to choose a sheet of wood to use. no sheet is the same, so we've got to think about the tone of the panel and how it's going to balance with it's counterpart(s) in this somewhat symmetrical design that we're going with. in this way, it reminds me of when we laid out the soapstone for the bathroom floor. the spacer and gap lines remind us of tiling the bathroom walls.

it was a late night. have I mentioned that it's slow going?

- John


Monday, December 17, 2007

Pure class

Woke up Sunday morning with one major task remaining before we could actually start putting up the ceiling. That would be running the electric planer along the first beam, since ceilings will make it much tougher to get the planer in there. (Back in September, when we put those beams in, things were moving fast. We didn't have the planer in time to dress the first beam-and-posts, so we just put them in as they were. For the second set, we were able to plane and bevel them outside in the yard, which is much easier than doing it once they're installed.)


We made a makeshift scaffolding, John tried out the planer on a scrap of oak post, and then climbed up to attack the beam. It was slow going, taking off a layer of splintery wood, black saw marks and blue pencil graffiti. Plus there were deep grooves at regular intervals from, we think, a broken tooth at the sawmill. John got enough done on one face of the beam so that we could get the ceiling up, but this will definitely be a big job to finish another time—three sides of the beam and three each on two posts. It's looking better already.


After leftover pizza and still more planning, we felt ready to cut our first piece of ceiling. No wait—make that a dress rehearsal—John wisely suggested that we cut a practice panel first, to get our technique down. The first panel would be unusual, with "tabs" that wrap around both sides of the chimney: another reason to practice.


We both feel like this ceiling is the culmination of our renovation project in a couple of ways. First of all, the dining room feels like the heart of the house, and we've always known we wanted it to feel really cosy and warm. We decided long ago that a boring sheetrock ceiling wouldn't cut it, and we went back and forth about what to use instead. We thought of plywood but weren't sure what that would actually look like. I fantasized about some kind of reclaimed wooden planks, but we had no time or money to acquire such a thing. We learned more about finish-grade plywood and eventually settled on that; choosing a species of wood and designing the layout of the panels was kind of a hasty process, but what else is new? We're excited about what we're doing, and it's a big step up from the other ceilings we've put in.

It's also a culmination because this way of putting up plywood—with deliberate gaps between panels, and making the fasteners part of the design—is not going to leave a lot of room for error. It's going to take all the skills we've developed in our nine months of work. There will be no paintable caulk hiding mistakes on this one.

So here we were, cutting our first panel. We were working without any music on; it felt like serious business. Measured super carefully, clamped a guide on for the circular saw, John made two of the cuts. Then there were some Skil saw cuts to do. The guide didn't work out for this saw, so he freehanded them. We got up on ladders and dry-fit it: almost. Need to shave some off the tabs. We did and it fit. OK!

We were glad we'd rehearsed. Time for opening night. Now, our ceiling design calls for a "stripe" of darker wood down the center of the room—an idea John had long ago. Of our 13 plywood panels, two are noticeably darker. Perfect! We laid out a lovely panel, figured which part of the grain we wanted to use for this piece, and marked it up. Many minutes of careful cutting. And here it is.

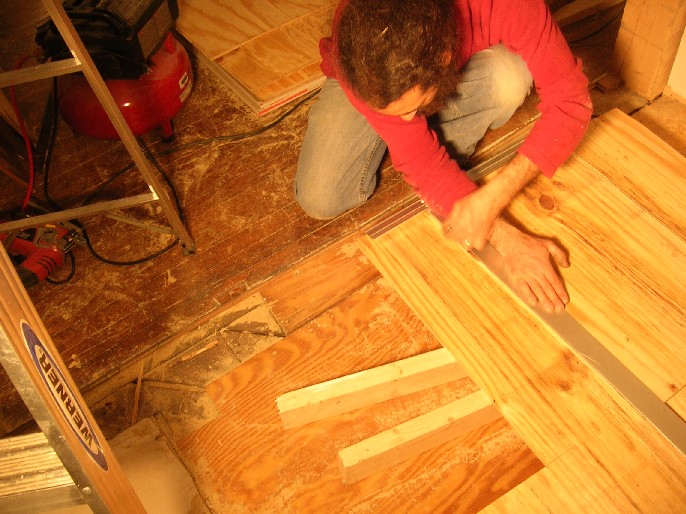
Now for the fasteners. We have to plan every screw, since they will all be visible. We marked them out and John drilled into those spots with the "forstener" bit. What this does is make a dimple in the plywood—only halfway through. Then you put your screw through the middle of this dimple and cover the head with a round wooden plug.


We held the panel up, predrilled for the screws, fastened it in and hurrah!


Did one more panel last night. It's the very center of the room, a perfect square, in the middle of which hangs the "chandelier" (which sounds a lot grander than the ancient used fixture we bought at a junk shop). We rotated this one 90 degrees so that the grain will go perpendicular to the rest of the room. (More last-minute design.) Cut out the light fixture opening, put it up using a paint mixer to space it evenly off the first panel, and hurrah again!


So far, so excellent. We're really happy with it. John said, "This is gonna look like a university library!" Yep, not just a college library, folks, a university library. It looks modern, with the gaps along the seams, and also very warm and visually interesting because of the grain. And we've only covered about 14 square feet so far. I'm hoping we get a little faster as we continue.

Ate our dinner under the two panels with our heads craning back to look.

- Erika


More nuts and bolts

Friday, our ceiling materials were delivered. We have decided to build our dining room and living room ceilings out of 1/2", cabinet-grade, birch plywood. It looks beautiful just sitting there. 13 4x8 sheets of it.


I can't even remember what we did Friday night. Seriously. Is that bad? We did something...it had to do with getting the dining room ceiling joists ready for the ceiling installation. I know we fired the furnace back up in time for the cold and windy weekend we were expecting. I think we finalized our dining room ceiling design and made a list of everything we needed to get for that project. Oh well, certainly I remember what we did on Saturday.

Saturday morning, grey and cold, snow on the way. I headed over the mountain with a long list of items including a forstner bit, wood plug cutter, fine circular saw blade, standard drill bits, quart of flat black paint, ceiling fan hanger, Christmas gift, Danish oil, a dozen steel L brackets, 4 dozen lag screws, and even some non-items such as "escutcheon research."

Safely back in our warm home and re-coffeed, I set myself to the task of securing the ceiling joists to the living room beam. Ceiling joists from the dining room and living room both rest on this beam and they hadn't been nailed back down since we removed the old top plate and replaced it with that hunk of red oak. These joists, in addition to holding up the attic floor, keep the outer walls from falling out. If they're not nailed down, our outer walls aren't getting the support they need. This has kept me awake on more than one occasion. Of course, with a floor above and all of our joists doubled up, there is no way to swing a hammer, toe nailing several heavy nails into the beam. So, galvanized L brackets and 2" lag screws to the rescue.

This was tedious and tiring. Each hole had to be started by tapping a nail in and pulling it out (difficult, again, with no space to move a hammer). Then I would work on ratcheting the screws in, which wasn't too hard once you get 'em to grab. Ratchet ratchet ratchet, ratchet ratchet...ratchet ratchet ratchet. Yeah. For like three hours. But now we've got those joists tied down good and solid, and at the last minute too; we had some wicked winds blowing through here the day after. I'm sure it would've been fine even if we hadn't secured the joists, but it feels good to not be worrying about this anymore.


I took a quick break to go make some pizza dough and set it in the oven to rise over a pot of steaming water. Mmmm.

Next up, nailers! Sound familiar? Having decided on which of Erika's ceiling panel layouts to go with, it was time to measure up and mark off where the ends of each panel will fall so that we can screw in blocks of wood to nail 'em to. We marked, Erika measured, cut, and started screws in them, and then I went around installing them flush with the bottom of each old joist. I've found that, once I get a nailer lined up, tacking them in with the finish nailer helps keep them from shifting as I sink the screws. Erika followed behind, painting the nailers black. She also put a coat of black paint along the lengths of the joists that will be under panel seams. We plan to keep an eighth inch gap between panels, which is why we're painting the joists and nailers black.

We cleaned up and that was it for the night. I had spent all day on the ladder, looking up, reaching up, ratcheting, nailing, drilling. We laid on the hardwood floor underneath our work and rested our backs, looked up at the black outline, the first full-scale representation of our dining room ceiling.


I could smell the risen dough from the kitchen...let's go crack a beer and make some pizzas!

- John

Monday, December 10, 2007

of bedrooms and biscuits


Sunday was another warm day, in the 50s. We were noticing the deep blue haze that was moving low over the mountains and appreciated the difference in the weather up here, as opposed to down on the open farm land about 20 miles east of the Blue Ridge where we used to live. I also walked around the back field for a while under the pretense of scoping out some fallen trees to cut up and haul back later on. I see and hear wood peckers, a chicadee, an eastern phoebe, and several cardinals. The land has returned to the way it was when we first starting checking the place out a year ago and it's easy to walk into the field without a path. I look down and see grasses that have spent the spring and summer suppressed by the now dried golden rod and imagine this area returning to a healthy meadow. I also imagine what it would be like to finish up the bedroom today. So I left the woods and we got ready to put the second coat of bee pollen on the walls.

Finish coat of white on the ceiling, done. Second coat of yellow on the walls, done. Put a finish coat of white on the narrow strips of trim that will cross the ceiling.


While all the paint dried, we took the opportunity to go out and collect some wood for the furnace. There was a small tree, a black birch I think, that someone had cut down before we lived here. It laid across one of the paths we had cut and I always imagined we'd start any small wood collecting effort with it. So, I cut it into four foot lengths with the chainsaw and we carried them back down the hill to the house. There were a couple of other trunks out there, much fatter but much shorter, too, and we cut and hauled those back as well. It's hard to say, but in that short time we probably gained about a week's worth of wood.

Breaked for lunch and a trip to town for the necessities (wine, eggnog, fresh buttermilk), came back and made some coffee, decided break time was over and got ready to put the ceiling trim up.

Trimming went pretty smoothly, all things considered. We held the first long board in place against the wall where it meets the ceiling and pressed it firmly up against the ceiling. We knew there would be some gaps that we'd have to address - as you've heard us say so many times, there isn't much that's level, square, or plumb up in here. But, everything looked as expected so, using our indispensable finish nailer, we nailed it right up. Same story for the next three boards, forming a nice top border all around the room. Gettin' there.

Then we picked up the narrow strip of trim that we designed to run across the ceiling and hide the butt joints and held that in place. We needed to trim 3/8" off. There we go. Fits nicely. Nailed it up. Repeat for the second strip. Erika called the second strip "the decoy," because it isn't being used to hide anything; it's just there for design sense, to add balance to the first one.

Things were looking good, but it was looking like we'd need some quarter-round moulding to run along the top of all the perimeter trim, since there were some gaps that really show through with a white ceiling and trim. We hadn't planned on using quarter-round and were slightly let down that we wouldn't have a finished-looking room tonight. I had planned on caulking the trim anyway, to keep cold air out, and got my favorite paintable white caulk - the stuff that saved our asses with the bathroom window trim.

I drew a bead along the top of the trim/ceiling and then followed up by tooling it with my finger. Forget the quarter-round, this looks great, and it's going to look nearly perfect after we touch up the paint. While I took care of the perimeter, Erika went around and dabbed extra caulk in all of the nail holes.


Then we straightened up the house, which had been destroyed over the course of our working 7 days straight in the bedroom and living with our bedroom in the living room. We poured a couple of ales and sat on the floor of our bedroom, gazing up and around at our awesome, awesome work, feeling a little giddy, feeling beat down and sore, feeling accomplished.

And if that wasn't accomplishment enough, I think we set a personal biscuit record by baking the best biscuits ever to go with our vegetable soup. I'm telling you, they were unbelievable. It's all because we thought we were buying this local, non-homoginized whole milk for them but instead we got the buttermilk. Had never used this in our biscuit recipe before. Now I don't think we'll use anything but.

- John


By the way, to follow up on Erika's previous post about doubting the color...we like it.

Another giant weekend


We're pushing hard. Our weekends lately are like running a marathon, only with coffee instead of protein drinks. Celebrated the beginning of the weekend Friday night by slapping up the rest of the bedroom ceiling, then priming it. Once again we master a task just as we finish it and leave it behind!

Next up: In order to be able to move our bed back into the bedroom and enjoy a relatively finished state of affairs in there, we needed to trim out the ceiling. (This would be the moment of truth, since the ceiling installation had left various gaps along walls and between panels, and we'd always said "trim will cover that." Were we right?) And we decided to paint our walls while we were at it. They were a color I dubbed "dingy peach," seemingly chosen in an ill-advised attempt to match the forest green trim around the windows and doors. Also, they were cracked and dented and generally abused. John put some spackle on the cracks. On Saturday morning, we chose a new color at lightning speed—Bee Pollen!—because it works with the green and because we had to get going to Lowe's.

Over the mountain, down the other side, and into the big box. We bought three kinds of paint (ceiling, Bee Pollen, and wall primer), two kinds of trim (one for the tops of the walls and one to cover the "butt joints" between ceiling panels) and various sundries. Then we went to this coffee shop in a nearby strip mall. We'd been there once before. Its main advantage is that it's not Starbucks. Last time we went, John ordered a ham and cheese croissant and was given a squashed croissant with ham and melted cheese piled on top, in that order. What the hell is this mess? Well, maybe the kitchen person was in training. If at first you don't succeed, try again. Saturday, John wanted to order the same thing but said, apologetically, "This might sound weird, but do you put the ham and cheese inside the croissant?" The kid at the register says, "No, we put it on top." John: "Well, can you put it inside?" Kid: "No."

Back at home, we tried to imagine how all the timing would work out for the day, what with the various paints and primers needing to dry between coats. You don't really care about this puzzle, do you? In some order that I don't totally remember, we:

-Caulked the ceiling joints
-Sanded the spackle, then primed the walls
-Cut the trim pieces, beveled the edges with the router and hand plane, sanded them (John got a splinter the size of a toothpick which went in one side of his finger AND OUT THE OTHER SIDE), primed and painted them
-Painted the door and closet door for good measure
-Put the first coat of yellow on the walls. Uh-oh. Do we like this? It's pretty damn bright.

Cooked up some dinner and collapsed.

- Erika


Thursday, December 6, 2007

Plybead marches on


We've been working on putting up the bedroom ceiling! After our big cleaning on Sunday, we enjoyed about 48 hours of cleanliness and order before destroying it all by moving our bedroom stuff into the living room. Did some framing Monday and Tuesday, and by Wednesday we were ready to insulate and put up the two full sheets of beadboard this room will take. Now we have the 5 small pieces still to go. This is our last beadboard ceiling; for the living and dining rooms, we're concocting a plan to use finished plywood. More on that soon.


Also had another very successful visit from our renovation inspector. The upshot is, next time he comes out we should be closing out our loan and ending this phase of our life and of the renovation. There will still be plenty to do on the house, but we'll be doing it on our own terms, which probably won't mean every freaking evening and weekend. If you are a friend or a family member of ours, you can expect the shameless neglect to stop sometime in January! Yay!

Don't count on the endless house-babble to go anywhere, though.

- Erika

Monday, December 3, 2007

A Sunday in December

Creaky morning after such a big push on Saturday. We had a bunch of small things left on our list for the weekend. I got up, made coffee, started washing dishes and foolishly (and apropos of nothing) said to John, "I'm glad we don't have to go in the crawlspace today."

A few minutes later I was draining the dishwater and heard a funny sound under the sink. Busted drain line! John checked under the house and sure enough, there was soapy water making a lake on the vapor barrier. So, after a bowl of oatmeal for fortification, it was into the crawlspace with me.

I pushed up on the drain, John screwed the fitting back together in the kitchen, and then I put a piece of strapping under the elbow for good measure. Mopped up the puddle. Onward.

We plan to have our main electrical line moved to a different point on the outside of the house. (That's because it now takes a pathway between the power pole and the house that crosses right over our second-floor deck—according to our home inspector, "the most outrageous safety violation [he'd] ever seen.") All the eaves and trim on that side of the house need to be scraped and painted, and I figured I'd do the area where the electrical line will be going. Then we can have it moved and I can scrape the rest. And so, John helped me put the ladder in place and I climbed up there and did the deed. It started raining before I could finish the painting, but what can you do?

Meanwhile, John was putting in clamp fittings to support the pex lines that come inside from the Heatmor and go to the water heater. These have been flopping over and looking unprofessional. Now they're all nice and square.

Next up: A whole bunch of cleaning. Can I tell you about the way we've been living since we started the kitchen ceiling project? All our kitchen stuff has been piled all over our living room. The dining room has had 4x8' sheets of plywood and drywall stacked in the middle of the floor, leaving small pathways around the edges of the room. Our table has been next to the kitchen window, meaning our cat thinks she has the right to sit on it and look outside and leave a thick layer of fur on the tabletop. Sawdust and filth has covered everything from the countertops to the couch. When we want an onion or a jar of nutmeg to add to our filthy dinner simmering on our filthy stove, we wedge ourselves between large objects in the living room and reach down onto a filthy attic step where the onions and spicerack are ignominiously stored.

So we fixed all that and now we feel much better.

- Erika


Another day, another ceiling

Friday, Erika primed the kitchen ceiling.


Friday night, we finished the tool room ceiling framing (nailers, shimming, etc) and insulated the room.


We had a big day planned Saturday.


No time was wasted getting going, either. I was in the basement swapping out the radiant mixing valve before the coffee was done steeping. It went smoothly. We isolated that section of the system by closing the valves at the send and return manifolds, drained the relatively small amount of water, and unscrewed the three nuts that hold the mixing valve on the copper tail pieces. The reason we swapped it out was because the one that was supplied to us with the system was noisy and we were told that they had received a batch like this, so we were sent a replacement. Once it was in, we closed down all but the first circuit and purged the air. Opened everything back up and we were ready to fire up the Heatmor again.

The weather has been mild, so we let the furnace burn out a few weeks ago and have been relying on our space heater on cold nights. We cleaned out the ashes from the furnace, checked the water level, and got the fire going. This time around, we got it lit on the first try and we had the water up to temperature in under an hour. We had no troubles keeping the fire going all day and over night - we've had some practice with it since the initial firing over a month ago.

Next on the list, tool room ceiling. We call it the "tool room." Eventually we will call it studio or office. In house speak, it's a bedroom. Call it what you will. But it needs a ceiling. We had to trim a little length off of Deadman. We dry-fitted the first full sheet and all looked well, so we made a mess of the gluing then hoisted the sheet up there and wedged Deadman underneath it. Pop pop pop, nail gun on the case. The room took two full sheets, approximately a third of a sheet (8' long, though), and three smaller pieces. Several hours later and with little trouble, we got the ceilings up in the room. We even got our light fixture cut correct the first time.


We still had a few odd cuts to make if we were going to complete the kitchen ceiling. We made the cuts and got those pieces up as well.


The night was still young. Why not prime it all? So prime it all we did.


Done by around 9:30, dry, sore, and hungry. Feeling victorious, we feasted.

- John